Charlie took this photo of us and even though it isn't perfect it's one of my favourites.
The sun peeping through the top left shines a light over alfie making him look like a cherub.
The fact the photo is slightly out of focus gives it softness.
I love that I am kissing Alfies head and my hand shows I am hugging him tight to me,
it hasn't been cropped it's how Charlie saw us through the lens.
It's a moment of calm in the madness of life when you have crawling baby.
Plus because I am behind the camera it's rare to get one of me.
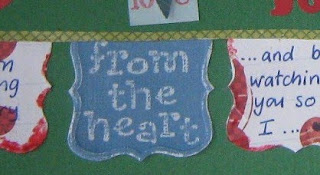
I tried to go with a collagey effect here. Lots of texture. Lots of layers.
I am pleased with the effect (if I do say so myself LOL).
I didn't want the photo to get lost so the little stamped a next to the photo draws your eye in without realising it.
The 3 name plates are embossed (2x2 QK folder) then cut out.
The 2 red/white ones have been distressed by rubbing the edges with my knife blade (scissor prob safer). Using glue stick glue small pieces of the edge and flock them.
The middle one has been made with the same embossing die using white core cardstock.
Emboss the phrase first (QK LOVE set) before the frame or the pressure of the blank space inside the frame flattens the phrase. Leave the card on the embossing plate to sand it. Lastly scrape the edges.
The heart took alot time but I enjoyed making it.
HOW TO MAKE THE HEART:
You will need: patterned paper (I used Cosmo Cricket), 3 heart punches in different sizes, LOVE word stamp, flocking powder, scissors, glue dots, glue stick.
I decided to have the large heart dark blue, middle size yellow and small one red.After selecting the papers wanted punch out hearts. I did about 20 of each (left over ones could be card toppers or future embellishments).
Screw up each cut out heart, then lay on the table and rub sanding block over the top (could use emery board or sandpaper if don't have sanding block) this brings out the creases and creates a distressed effect.
Glue dot them and layer on top of each other.
On another piece of plain paper (I used pale blue) stamp the word love many times, I did this in a grid like fashion, making sure you have room to fit the heart between the words.
Glue dot the layered heart placing the bottom of the heart over the Vin the word LOVE. Trim around the heart in a rectangle shape.
On scrap paper (you won't see this under finished design) hand draw a large heart and cut out. Make sure you play around with how you want the hearts placed BEFORE the next step.
Cover the cut out heart in glue, then place on top of this all the rectangle shapes.
This next step will be the red heart in the above photo:
On the back of patterned paper draw a heart slightly smaller than one already have and cut it out making it slightly thicker than pencil line.
With the glue stick randomly glue in places along the edge. while glue still sticky press into a pile of flocking powder (found this way works easiest for me but feel free to let me know your opinion).
Glue over the top of finished piece.
Voila.
Thanks for looking hope you haven't fell asleep.


.JPG)


2 comments:
Oh I love love love that heart. and I just adore that lil soilder looking queen guarding guy in your header!!
Your right Lorna.. it's a wonderful picture. Charlie did a fantastic job taking it.
Directions on how to make the heart.. I'll be trying.. but "from the heart" caught my eye.is that a QK folder?
Love this layout def a moment worth capturing
Post a Comment